- Exploring the World of GeGeGe no Kitaro in Chofu - 21 May 2026
- How Does Happy Entry Work at Tokyo Disney? - 20 May 2026
- The Beginners Guide to Soba in Japan - 15 May 2026
Kimono can look beautiful, but they aren’t the easiest item to put on solo – but this class in a quiet area of Tokyo helps you create one you can wear at home. Here’s what happened when I tried it.
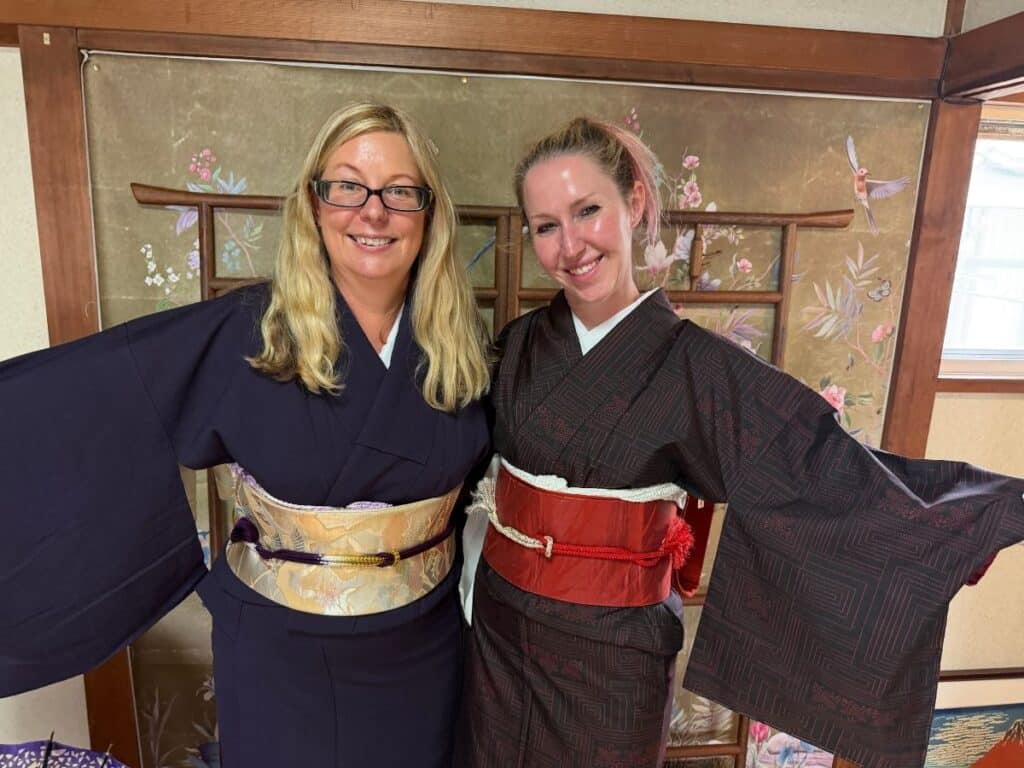
Look, it’s me – in a kimono I made. In about an hour. And considering the level of my crafting skills, this is nothing short of a miracle.
Article by Helen Foster. Disclosure: Some links in this post are affiliate links. See our Affiliate Disclosure.
Okay, so ‘made’ might be a bit of a misnomer; adapted is more accurate, but the important point is that if I can do it, anyone can. So, let me explain what’s involved.
How Do You Make Your Own Kimono
I booked the 3-Minute Kimono class via Klook and turned up as directed, a little after lunch. Once we arrived and greeted our teacher, the fun began.
There are basically four steps to the process.
1. Choose Your Kimono
The house where the class is located is an Aladdin’s Cave of bright coloured fabrics. There are obi belts stacked up on one side, other kimono accessories against the far wall, and then the treasure trove of actual kimonos waiting for you to pick your favourite among the rainbow wall of designs.
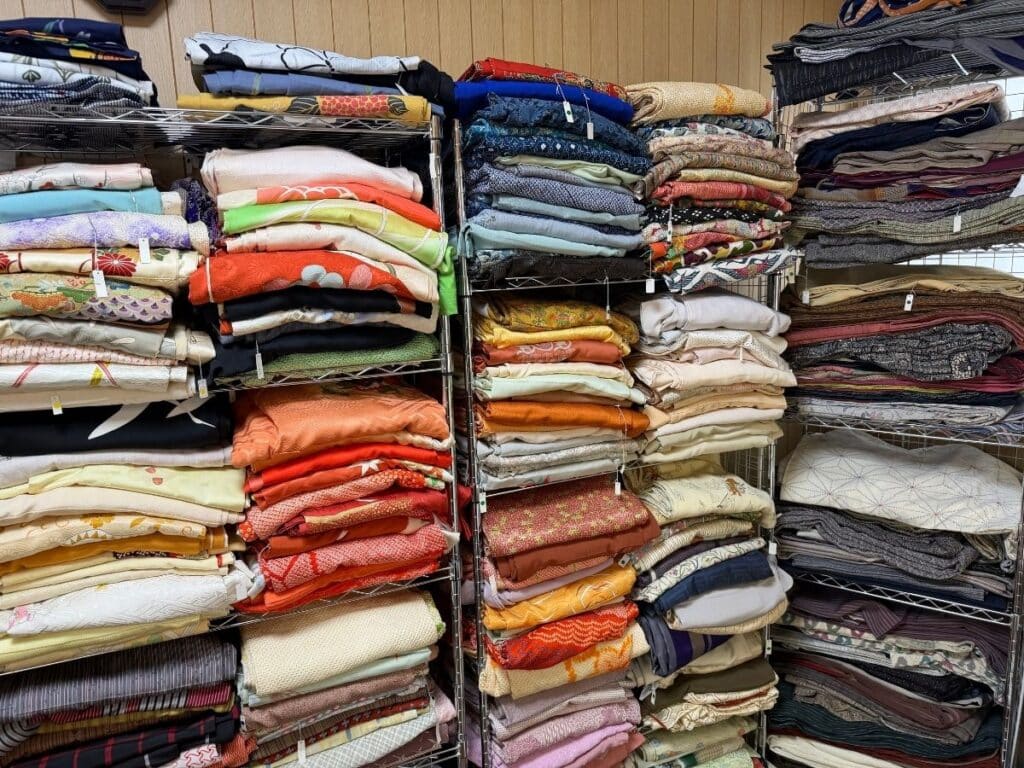
These are all second-hand, so they ask you to check them carefully for rips or tears. Also, check the price tags. The kimonos with a red dot on the price tag are included with the class, but any others cost extra.
Those with a blue dot cost 2000 yen, those with a green dot are 4000 yen extra, and those with a yellow dot add 6000 yen to your experience.
Because I didn’t know how much of a mess I was going to make of mine, or if I would even have enough room in my luggage to carry it back, I decided I would only even look at the ‘free’ ones.
I toyed with bright shades or flowers; almost settled on a white one with a blue and red pattern – but, my favourite colour is purple, and so I just looked a bit further down the rack where the shades were getting darker and found a thick purpley, blue one.
When I pulled it out, the teacher was amazed that it was a red ticket. It was a heavy fabric and in perfect condition. I think maybe someone made a mistake with the sticker gun, but it was now mine!
Both my friend and I chose quite plain, dark kimono but they had all sorts of colours and patterns if you are looking for something brighter or more ornate.
How Much Does a Kimono Normally Cost?
A lot!
A chart on the wall explained that a basic new kimono will cost around 100,000 yen – but a special kimono from a high-end department store could cost as much as 5 million yen!
2. The Craft Bit
When I first read about this service, I wasn’t going to do it myself as I imagined sewing machines and other things I can’t work. My plan was to send my friend, who is basically a master costumer, to sew things while I went off and had an ice cream or something.
But then I read two magic words in the description – hemming tape. Even I can use hemming tape!

Basically, what you are doing to remake your kimono is cutting it in half, and hemming it, so you can wear it in two pieces. The thick obi belt worn around your waist hides the join.
Easy!
After your kimono is measured against you, it’s marked ready for cutting. You do have to sit on the floor for this bit, so be prepared for that, but otherwise it’s just cutting in a straight line.

Then you get to work with hemming tape on a mini ironing board, folding the fabric over the tape to create the hem and ironing it into place.
My friend was finished fairly quickly, while it took me a little while to get into a rhythm, mostly as I was scared of messing it up, but I got there – even if it wasn’t the straightest hem ever created.
3. Choosing Your Accessories
The fabric part of the kimono is only part of the look. You also need a wide sash around your middle called an obi, and then accessories, the obiage and the obijime (explanations below) that finish things off.
The next step in the process is choosing all of these for the photos.
There’s a great selection of these, and it’s fun trying to decide which will look best with the kimono you’ve chosen.

It’s important to note that these are just for the pictures. You don’t get to take these away with you. If you do want to buy them, they are priced separately, starting at 4000 yen, this includes an obi, obiage and obijime.
Because my kimono was plain, I decided to go over-the-top and pick a gold obi with a giant bow; I wouldn’t choose this if I were wearing a kimono for real, as you should never crush the back of your obi. While the flatter backs with pillows are a bit more forgiving, wearing something this ornate means sitting up very straight.
Related Read: See more etiquette tips, and what Japanese people think about foreigners wearing kimonos, in our guide to wearing a kimono in Japan.
4. Dressing in Your Kimono
Once you’ve created your kimono, the teacher helps you dress in it.
This is a modified version of the real kimono dressing process, which has about 12 different steps.
The Parts of a Kimono Explained
There are six visible parts to a proper kimono; the collar, the kimono, the obi sash around your middle, the obi pillow that pads out the back, the obiage, a piece of fabric that goes between the kimono and the obi at the front and the obijime, the cord that you tie around the middle of the obi.
There are also undergarments, socks and shoes if you are wearing it properly.
Each part of the kimono itself also has a name, and there can be meaning to things like the length of the sleeves. Traditionally, unmarried women will wear longer sleeves than married ones. The colour and style of each element may also differ between formal and casual wear.
You start by putting on the skirt of your new modified kimono, then your dresser will fit a kimono collar – the white part that peeps out of the top. Then you put on the top part of your kimono, which is now more like a wrap-around jacket.

The obi, obiage and obijime then all go on hiding the fact that your kimono is effectively a skirt and a top.
If you want to wear your kimono at home, you will need at least the obi to make things look right and hide the join. You can choose to buy them at 3-Minute Kimono, or you can find kimono accessories in secondhand kimono stores around Japan. リサイクル着物三喜屋 in Nakano Broadway is a good one to try.
5. Time for Photos
Now, while I knew that the class finished with some pictures of you wearing your new kimono, I didn’t really think about what that involved when I headed out for the day. about five hours earlier.
This meant that by the time the camera started clicking, I had no make-up left and my hair, which looks like it’s never seen a brush at the best of times, looked like I spent the morning in a wind tunnel!

So, if you want to use the photos for anything important – like, I don’t know, putting them on the internet where thousands of people might see them, maybe bring a make-up for a quick touch-up and a hairbrush!
We were terrible models.
In the end, we got the giggles and decided instead to channel ABBA and create what looks like the cover of a Japanese concept album for a 1980s synth band! You can see us both trying not laugh.
I have seen some lovely pictures of other people though!

I can’t see any reason why you can’t wear the kimono out after your appointment if you want to – remembering you’ll need to pay extra for the obi. While the area where the class is conducted is a small residential area, there is a quiet shrine a few minutes’ walk away and a handy red bridge nearby to pose on.
And there you have it, I’m now the proud owner of a kimono I can partly wear at home.
A Few Extra Tips
A few further tips I think might help you enjoy the experience more.
- You take off your shoes when you enter the house where the class takes place, so make sure you’re wearing socks. You climb a fairly steep set of wooden stairs to the classroom, so bring sticky socks if you think you need them.
- You will need to sit or kneel on the floor during the experience, so make sure wear something you can move in. Short skirts might not be the best choice.
- Depending on the kimono you choose, it might be heavy and bulky, so you might want to book the experience closer to the end of your trip so you’re not carrying it around Japan with you. Mine had to go back with my friend as it was too heavy for me to carry around for the next month.
- Wear something slim-fitting underneath. You put the kimono over your own clothes for the photos. My friend was in slim-fit jeans and a singlet, while I had on a dress – in hindsight, something slimmer-fitting underneath might have been more flattering. However, from past experience, I always look matronly in a kimono, as the whole point is to create a straight silhouette. Without waist definition though, I just look short and plump!
- Bring a hair tie – or you might end up with a picture like this!

Where is the Kimono Making Experience?
It’s run by a company called 3-Minute Kimono. For our session, they worked out of a small house in Kiba in the Koto City area of Tokyo. It’s not on the normal tourist route, but it’s very easy to reach by the Tozai Metro line to Kiba Station.
Come out of Exit 2, and the location is just a 5-minute walk away.
We weren’t completely sure which house it was when we arrived, despite there being a signboard outside, as there was another kimono company next door.
Assuming the address on your confirmation is 6 Chome-8-6, this is the house you need.

However, the above is a small space, so if they have a lot of bookings for a session or you are a larger group, they may use their bigger location. Double-check the address on your confirmation so you know exactly where to go.
Do You Need to Book in Advance?
Yes. I booked my class via Klook. It cost AU$65 (around US$37.60 or GBP35) per person, which included the basic kimono to take home. Check dates or make a booking here.
The class is advertised as taking 90 minutes, but there were just two of us the day we went, and so we finished within an hour.
Can Men Make a Kimono Too?
They aren’t offered exactly the same class. Instead, they can create a kimono with their name on, like this.
Apologies for the slightly out-of-focus picture.

What About Kids?
Yes, they can join in too, although depending on what kimono they choose and their age, they may not need to do any cutting or hemming and will instead just get dressed by the staff and then get to keep the kimono.
If they do choose one that needs to be remade, remember, the process uses a hot iron, so you might need to watch them carefully.
Those aged 3 to 12 pay child’s pricing, 13 or older are classed as adults.
What Size Does This Go Up To?
I don’t have an official recommendation from the company, but I am an Australian 16 (US 12, UK 14) and I felt I was on the edge of being able to wear the kimono properly – remember, the ones you choose from are secondhand Japanese-sized kimono, so they do run small.
However, I have seen pictures of people with fuller figures than mine on the company’s webpage, and they do still make the look work, so, don’t let size put you off if you want to try it. Maybe contact them in advance if you’re a bit worried.
And that, I think, is everything you need to know. If you do take part, why not head over to the Japlanease Facebook Group and add a photo to show everyone your kimono too?