- How to Visit Gotokuji – the Waving Cat Temple - 13 August 2026
- 15 Day Trips From Osaka - 13 August 2026
- What is Hoppy? Japan’s Unique Beer-Style Drink Explained - 11 August 2026
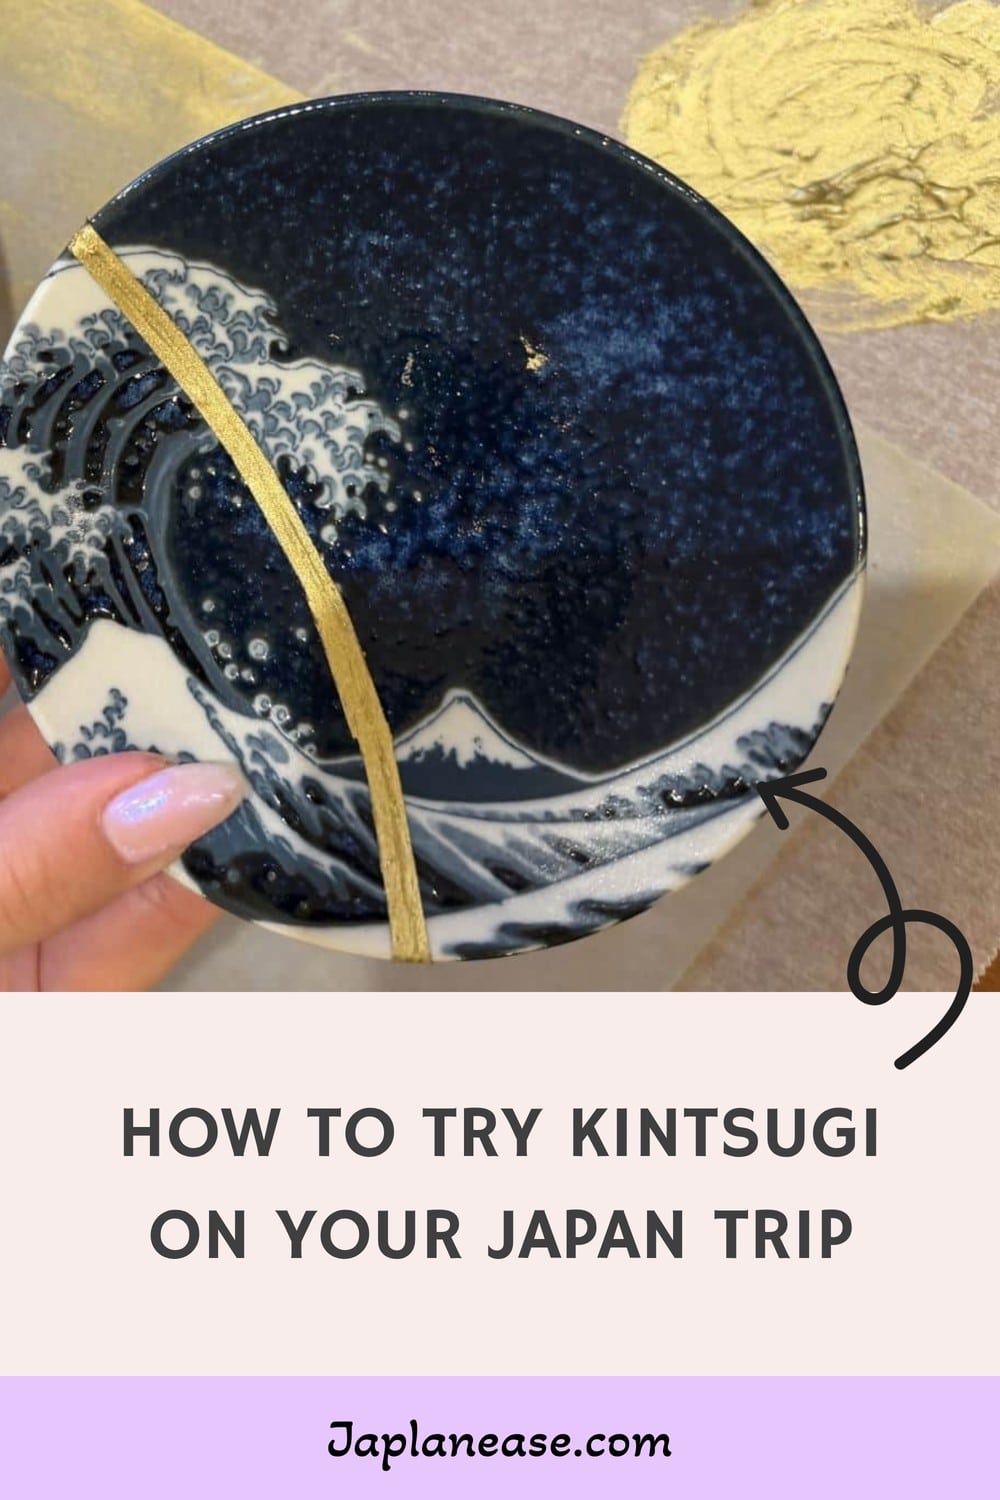
Kintsugi is the art of repairing something broken to make it look prettier – and now you can give it a try in workshops across Tokyo – but what’s involved? Here’s what I learned when I gave it a try.
I spent a lot of time training my legs for all the walking before my last trip to Japan, but about 10 minutes into my kintsugi class, I was regretting not doing some arm weights as well – this process seemed to require arm muscles I didn’t even know that I had!
Who knew that crafts could be a workout!

Article by Helen Foster. Disclosure: Some links in this post are affiliate links. See our Affiliate Disclosure.
You see, while you might think that creating your own pretty kintsugi plate is just a matter of adding some gold paint and sticking it back together, there’s a lot more to it than that.
A Brief History of Kintsugi
Kintsugi is the art of mending broken things in a way that celebrates their imperfection – in this case, by highlighting it with gold paint as you stick it back together.
The name comes from two Japanese words – ‘Kin’ is the Japanese word for ‘gold’, while ‘tsugi’ is the verb to join, and the principle comes from the Japanese principle of ‘mottainai’, which is regret over waste.

It’s said the process was invented in the 15th century when the shogun Ashikaga Yoshimasa sent a bowl to China for repair. It came back with metal staples in, and the shogun was not pleased with the look.
He asked the local craftsman if they could create a more aesthetic option, and they came up with the idea of highlighting the cracks as a feature of the bowl – and kintsugi was born.
It’s now joined chopstick-making as one of the most popular classes for tourists to try during their Japan visits.
Where I Tried Kintsugi
I visited the ZEN Japanese Craft Studio in Asakusa as it was near my hotel and also very wallet-friendly. I don’t exactly have superior crafting skills, so I didn’t want to pay a fortune in case I stuffed things up – or broke the result on the way home.
This class cost me a very reasonable AU$22, around US$15, via Klook. And it was worth its weight in gold (no pun intended) when on the day I was scheduled to get my crafts on, it was bucketing down with rain, making being inside highly appealing.

A lot of other people obviously thought the same thing, as the room was far busier than when I’d made my chopsticks at the same place the day before. They also offer knife making in the same room, so you can be surrounded by people doing all sorts of crafts.
Thankfully, as I did have an audience, it was actually a pretty easy process, despite all the whining about tired arms – and here’s what I learned while doing it.
1. Choose Your Plate Carefully
Picking your plate to work on is the first step in the process – the studio has racks of carefully cracked china for you to restore.
Depending on what studio you go to, or what price of class you pick, the options included might vary, but for this class there were two different styles included in the price – and others I could have used if I’d paid to upgrade.
The inclusive styles on the day I visited were the two pictured below – a small white bowl with fish or crustaceans on it (the one I chose) or a larger dark one with sakura.
The exact selection might vary, but a friend of mine did the class a few weeks after me, and the selection was similar, with a small white option and a larger, darker one.

The plates you can upgrade to are larger and fancier and cost 2000 or 4000 yen extra, which you pay directly to the studio. They do try to upsell you a bit but were fine when I just chose the inclusive option.
Each plate has a different break pattern; some cracks are straight, some have triangular chunks missing, so you could also choose the pattern one that appealed most.
I liked the crab plate; plus, I had limited suitcase space, so the smaller the better for me, but I soon realised that the larger, darker plates do give a more dramatic effect. You can see the result on one of them in the first picture above and another image right at the bottom of this post. The Wave and Mount Fuji upgrade options were very popular the day I visited.

Also, I think, after seeing everyone else’s finished plates, that you get a better look from the plates with a triangular crack out of the side, or something off-centre about the crack, rather than my one that was straight through the middle – even though I liked it at the time.
So, do spend a little bit of time thinking about the look you like best before you get started.
One thing to note: while writing this, I started looking at kintsugi class options on Klook to check nothing had changed, and I noticed some cheaper classes available (under AU$10). However, looking at the wording of what’s included, I’m not sure that this price includes a plate to work on. If it does, brilliant, but don’t be surprised if you have to pay a little bit extra for your plate if you book the cheapest option.
2. Prepare for Some Effort
This is the bit I didn’t know about until I started this process, but it’s essential to how the plates look.
I thought you’d just glue things back together and paint on the gold, job done – but that’s not the case. Instead, you use a metal file to remove any rough spots that might cause the gold to capillary and spoil the neat look of the edge, but also to enlarge the gap between the two edges of the plate to allow the gold to show.
This is where the arm muscles come in. It requires more pressure to do this than you might think.

Also, if you are sensitive to scraping noises, this is not going to be your happy place. My teeth immediately went on edge. I soon got used to it, probably because my brain is one big earworm and so, at this point, it started channelling Dory from Finding Nemo singing ‘just keep filing, just keep filing’ for the 15-odd minutes it took me to create my gap.
At this point, I became very happy with my plate choice! The larger plates are a lot more work to file through as the edge is thicker and the line you need to create is longer.
Save Money with Klook & Japlanease
If you plan on buying tickets or tours from Klook for when you’re in Japan, you could save up to 10 per cent by using the code JAPLANEASEKLOOK at the checkout. Click here to see what’s on offer.
T&Cs apply. Some items, including Tokyo Disney and USJ tickets, are not available for discounts.
3. Decide on Your Line Thickness
Once I had created a line thick enough to work, it was time to glue the plate back together. It only takes a few minutes for the glue to take, but then you must mask the edge of the line you have created with tape to stop the gold paint from spreading when you apply it.
You can position the tape with a wider gap if you’d prefer to create a more obvious gold line. Because of the position of the crack in my plate, I couldn’t do this without hiding the crab design, but I did like the look of the plates where people had made the line much wider. There are some pictured at the end.

This was the bit I found hardest, as you need to try and keep the gap even along the plate, and as I mentioned when I had to cut things in my kimono-making class, I’m terrible at doing anything in a straight line.
The staff are checking on your work the whole time though, and they do spot anything that might spoil the result and help you fix it. They’ll make sure the tape is even all along and, most importantly, will smooth out any bubbles that the gold paint might sneak under.
4. Watch Your Fingers
Finally, it was time to apply some gold.
The paint is actually a thick paste made with gold powder and lacquer. It’s mixed up in a blob on your work mat, and you then use a toothpick to apply it into the line you have created.
This is quite a precise job – and you have to be careful not to get any gold on your fingers or other parts of your hand, or it can then transfer onto bits of the plate you don’t want it on. Needless to say, I was covered in the stuff by the end of it!
Again, the staff are primed and ready to help you with a solvent that removes any stray sparkle. The gold takes a little while to dry to the touch, and then you are finally ready to peel off the tape to reveal your new creation.
If you decide to pose for photos with it, please try to hold yours up the right way!!!!

The class was 90 minutes long, and it took the whole time to create the plate.
I did really enjoy it – and it was the perfect activity on a rainy day. If you want to do the same one as I did, this is the class I booked.
Other Questions You Might Have
In case you’re wondering…
Can Children Do the Class?
Theoretically, as there isn’t a minimum age, but note that the process is fiddly and requires quite a lot of arm effort and concentration, so it’s probably more suited to older children.
Also, note there isn’t a heavily discounted child’s price – both adults and kids pay around the same.
Is the Venue Wheelchair Accessible?
Yes. My class took place on the 10th floor of a building in Asakusa.
There is a lift in the venue, and the floors are flat. There was actually a lady there in a motorised wheelchair the day I took my class. I did, however, notice that she had to position her chair slightly sideways as the table was too low for her chair to go underneath it, but this didn’t seem to stop her working on the plate.

Do You Need to Book in Advance?
It’s probably best to book to ensure you get a seat for your selected time, especially if you’re a larger group or family. Definitely book if the weather is expected to be bad on the day you want to take part, as the room was full when I went.
There are five sessions throughout the day, spread two hours apart. The first is at 9 am, the last is at 5 pm. Each session runs for 1 hour and 45 minutes, and you will need nearly all of that to complete the process.
Can You Book For One Person?
Yes, and it’s the perfect activity as a solo, as you’re very much in your own little world as you work – but there are also other people at your table to chat to and the staff are also very friendly.

Can You Use the Plates Afterwards?
Not for food. The metals and ingredients in the lacquer mean that kintsugi plates can’t be used for edible items after their repair. Display them as decoration instead.
Are There Classes in Other Areas of Tokyo?
Yes – a few other operators offer Kintsugi in the touristy areas of Tokyo.
This class takes place in Shinjuku and takes 1.5 hours. There are six sessions a day from 9 am to 6 pm.
If you’d prefer to do your class in Shibuya, this one takes an hour and runs five sessions a day. From 9 am to 5 pm.
There is also a selection of classes in Kyoto and Osaka. See all the options here.
And I think that’s all you need to know if you want to take your own kintsugi workshop in Tokyo. Enjoy.
Who Writes This Blog?
My name is Helen Foster, and I’m a journalist and author. My travel articles have appeared in publications including The Australian, Escape, RAC Horizons, Jetstar Magazine, Sainsbury’s Magazine, and more.
I’ve travelled to Japan nine times before – solo and with my partner and visited over 50 towns and cities. My last visit was in April 2026, so everything here is pretty up to date.