
- 12 Things That Seem Easy – Until You Try Them in Japan - 23 September 2026
- Is it Worth Paying Extra at Tofuku-Ji? - 16 September 2026
- Chopstick Making in Asakusa - 10 September 2026
The Hokuriku Arch is the name for the route that allows you to travel between Tokyo and Kyoto, the long way round. The Hokuriku Arch Pass is the rail pass that helps you do it on one handy train ticket. Our seven-day plan offers some suggestions on what you might want to see along the way.
The Hokuriku Arch gets its name from two things: the bullet train line running through this area is called the Hokuriku Shinkansen, and the route you travel upon is arch-shaped. Ta da – the Hokuriku Arch!
The route starts in Tokyo, then travels through Nagano, Toyama and Kanazawa on the Shinkansen and then continues down to Kyoto.

Article by Helen Foster. Disclosure: Some links in this post are affiliate links. See our Affiliate Disclosure.
While you can buy single tickets to do the route, using the Hokuriku Arch Pass allows you to travel around the region for one fare of 30,000 yen for seven days. As well as using the Shinkansen to travel between the big cities, you can also use local JR lines in the region to take day trips.
This plan only includes destinations that you can reach using the pass for free (or maybe with a small extra bus fare). For that reason, this plan doesn’t include Takayama or Shirakawa-go as official stops, as the Arch Pass does not cover them. Nor does it offer the option to take the Alpine Route from Toyama.
If they are on your must-see list, you are better off doing your trip without the pass. Check out our Seven-Day Central Japan itinerary or Five-Day Golden Route plan for ideas of your route instead.
Does the Hokuriku Arch Pass Save Money?
It breaks even more than it saves you a fortune. If you follow all the suggestions on the plan, your travel costs will be between 28,450 and 31,270 (using reserved seating on the fast train), depending on the day trips you choose. This doesn’t include getting to the station in Tokyo or any local transport used in Kyoto on your arrival day.
While that won’t lower your spending dramatically, it can be very convenient to travel on one ticket and budget for all your trains before your trip.
However, if you’re not exploring Kyoto and instead head directly back to Tokyo on day 7 (which takes 3 hours and costs 14,730 yen), the pass more than pays for itself.
If you decide to purchase the pass, you can do so in advance via the official JR site or Klook. Use our discount code JAPLANEASEKLOOK, and you might save some extra money.
If you decide not to buy the pass and pay as you go, you can also save a little more money by taking the slightly slower Shinkansen and using unreserved seats. You’ll also find some cheaper routes between the day trip destinations – some will be quicker than using the pass, while others will be much longer. The Navitime app can help you plan it all out.
Leaving Tokyo
Okay, so, off we go…
The Hokuriku Arch Pass does cover the monorail from Haneda Airport or the Narita Express from Narita, but unless you’re flying in early in the morning and starting this itinerary straight away, I wouldn’t waste a day of your pass on that journey. Instead, we’re going to start your pass now – leaving Tokyo.
The Hokuriku Shinkansen starts from Tokyo Station. Alternatively, if you’re staying in Asakusa, it’s more convenient to alight at Ueno Station. You can use the pass on the Yamanote Line (or other JR-run lines) to get you to Tokyo Station or Ueno.
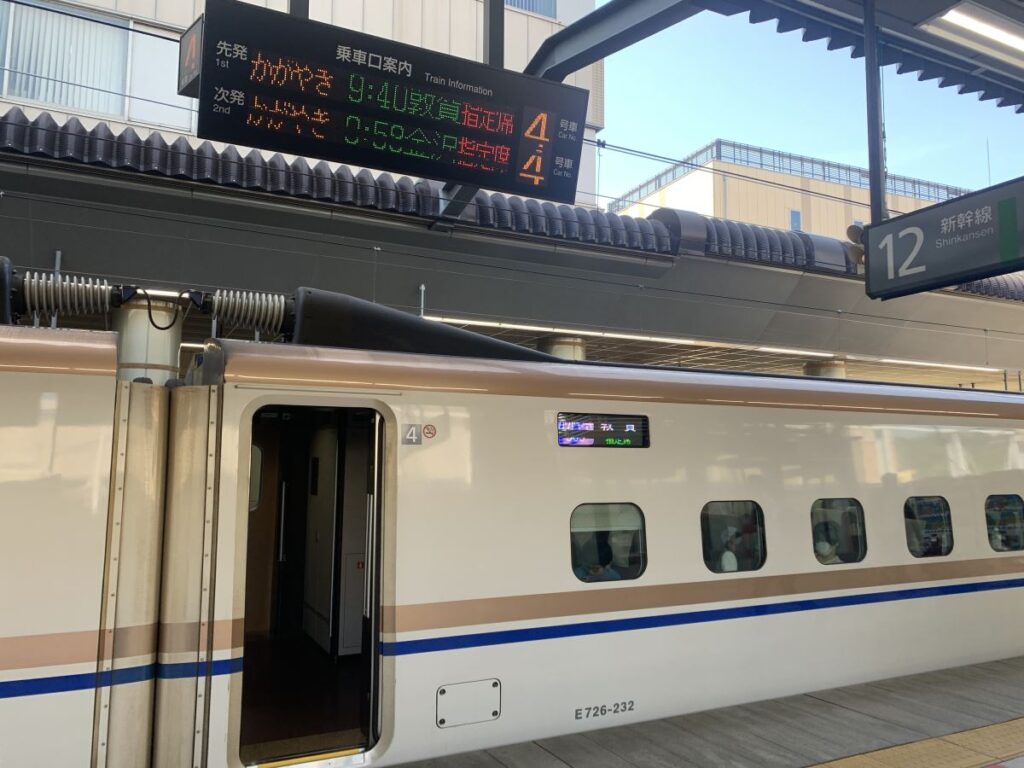
While having a pass makes jumping on a train easy, note that the Kagayaki, the fastest train covering this route, is one of the Shinkansen trains that require a seat reservation, so you might want to book this in advance once you decide on your plans. If you’d prefer just to turn up and go, then you’ll need to catch the slightly slower Hakutaka (it only takes ten minutes longer to get to Nagano).
If you are booking seats, you can do so at the station once you arrive in Japan. If you prefer to be organised, book the tickets online via either the JR East direct website or a third-party service like Klook. The SmartEx app, which you may have read about, does not cover this route.
Also, don’t stress about booking luggage seats on this train. The Hokuriku Shinkansen doesn’t have the same restrictions on luggage space as the other trains between Tokyo and Kyoto.
Note: To keep this post manageable in length, when I’ve written a more comprehensive guide to an area, I’ll link to that rather than listing every detail about it here.
Okay, travel housekeeping done – let’s get to the first stop.
Day 1 – Nagano (Stay One Night)
We’re going to start in Nagano – ex-home to the Winter Olympics, but definitely more than a snow resort.
It takes about 80 minutes to get here from Tokyo Station, so I’d suggest leaving Tokyo around 8-9 am to arrive in Nagano by mid-morning.
Before you leave the station, you might want to head to the Tourist Information Office and buy a stamp sheet for the Seven Lucky Gods’ Shrine Walk and collect the different stamps. This is a great way to see more of the city.

Leave your bags at your hotel and then walk (maybe collecting some stamps) or take the bus to Zenko-ji Temple, the main attraction in Nagano City.
This is a lot larger than it might appear, with extensive grounds and sub-temples surrounding it and plenty of interesting small details to spot (see our Zenko-ji guide on our sister blog Differentville for a guide to the quirky details to spot). Allow 2-3 hours for exploring here.
Prefer an Expert Guide? Book a Zenkoji tour here.

After exploring Zenko-ji, allow extra time to wander around the retro Gondo shopping area. I only had time to dine here at night and really regretted not being able to walk around the cool, old shops while they were open during the day.
Can You Visit the Snow Monkeys?
Nagano is the nearest big town to Japan’s famous hot spring bathing monkeys, but sadly, the train to these locations is not operated by JR railways. Therefore, it’s not covered by the Hokuriku Arch Pass.
If you do want to visit, the cost will be approximately 2,150 yen each way by train and bus (note that Suica cannot be used on this trip) using the faster Limited Express Service. Alternatively, a bus is available from Nagano Station that drops you directly at the entrance to the park for 3,000 yen. Find more details on our guide to visiting the Snow Monkeys from Nagano.
The trip will take half a day, so you may need to adjust the itinerary slightly to accommodate it and see all of Nagano.
How to Spend Your Evening
The main dining areas in Nagano are Gondo and the streets around the station. Spend this evening wandering Gondo – or to really get a good feel for the place, take this local bar tour, which goes to three different izakaya. I dined at Orion, which specialises in dumplings, but also take a look at the very cute soba shop, Togakushi.
Where I Stayed in Nagano
I chose the Chisun Grand Nagano. It had one of the comfiest beds I’ve slept in during my time in Japan! If it’s booked, or not your style, our guide on where to stay in Nagano has more options, including temple stays.
Day 2: Head to Toyama (Stay Two Nights)
Today, you’re going to move on to a place you might not have heard of – but as it’s being listed in many undiscovered places in Japan lists, expect that to change soon. However, before we get there…
At Sunrise
One special thing about staying in Nagano is the opportunity to participate in the O-asaji, morning service at Zenkoji. This occurs at exactly sunrise (to the minute) every morning.
If you booked a temple stay, access to this will likely be arranged for you; if you haven’t, or it isn’t, then you’ll find the instructions here to either attend the blessing outside, which does not require a ticket, or the full ceremony in the inner sanctum, which does. The site also provides the exact time of the ceremony, as it varies slightly from day to day.
AM: Toyama
It takes just 45 minutes by Shinkansen to travel from Nagano to Toyama.
Once you arrive and leave your bags, spend the morning exploring the city itself.
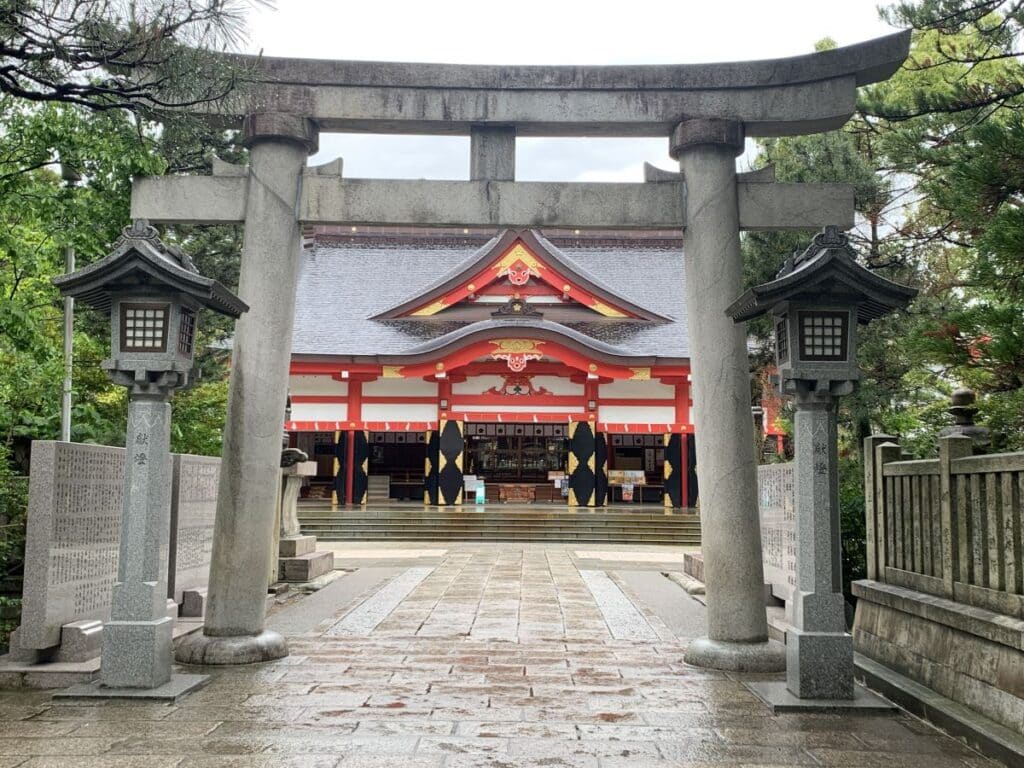
You might want to visit the Glass Museum to see the amazing Dale Chihuly sculptures and pay a visit to the Hei Shrine. Then, head back toward the station and visit ガッツリ!えびすこ to try a bowl of Toyama’s famous and very hearty black ramen.
Get more details on all of these in our guide on what to do in Toyama for one day.
PM: Iwase
From here, you can take the very convenient tram that traverses Toyama (you get a free ticket if you’re staying in a hotel in Toyama, so pick this up when you drop your bags) and ride north to Iwase.

This small town is home to gourmet restaurants, small artisan shops, pretty old wooden buildings and a famous sake brewery – all with barely any other tourists. You’ll appreciate that hearty ramen lunch even more when you’re seeing how many glasses of sake you can try in 15 minutes!
See more in our guide of things to do in Iwase.
Evening
Head to the free observatory on top of Toyama City Hall to watch the sunset, then perhaps pick one of the many restaurants in Toyama serving glass shrimp – another must-try dish.
Where I Stayed in Toyama
Toyoko Inn Toyama Eki Shinkansen Guchi 2 – the location is excellent, the price was fantastic, but I do admit that the beds were very firm – even by Japanese standards!
If that doesn’t sound like your idea of a good night’s sleep, find more options in our guide on where to stay in Toyama.
Day 3 – Day Trips
Toyama is a fun city in its own right, but it’s also an excellent base for some enjoyable day trips. Here’s where you might like to explore…
Himi
This town is full of what Japan calls Showa atmosphere – it’s a bit faded, a bit retro, and I loved walking up and down the main street looking in all the local shops; however, that’s not what brought me here in the first place.
Instead, I came because Himi was home to the manga artist Fujiko A. Fujio, and there are statues of his most famous characters along the High Street. There is also a museum dedicated to his work at the far end of town. See more in our guide to Himi.

It takes about an hour to get to Himi from Toyama, and the journey is fully covered by the Hokuriku Arch Pass (1560 each way)
Note – I only had two hours here, and that was not enough, so I missed a few things. If you’re a manga fan, don’t underestimate how long you’re going to spend taking fun pictures – and check out our guide above to make sure you don’t miss anything.
Takaoka
Takaoka is just 22 minutes away from Toyama. The city was home to the manga artist Fujiko F. Fujio, not the same person as Fujiko A. Fujio; the two were a duo and used the initials of their first name to distinguish each person’s work. As with Himi, Takaoka has attractions dedicated to his work – including possibly his most famous creation, Doraemon.
You’ll find lots of cute sites dedicated to the famous blue cat here, including a fun, decorated tram that rides around the city.
Including up to the fish market. If you’re here between October and December and February and April, this has a daily crab auction at noon that looks fascinating. This is otherwise a pretty quiet market, though, so don’t make an effort outside of crab season.
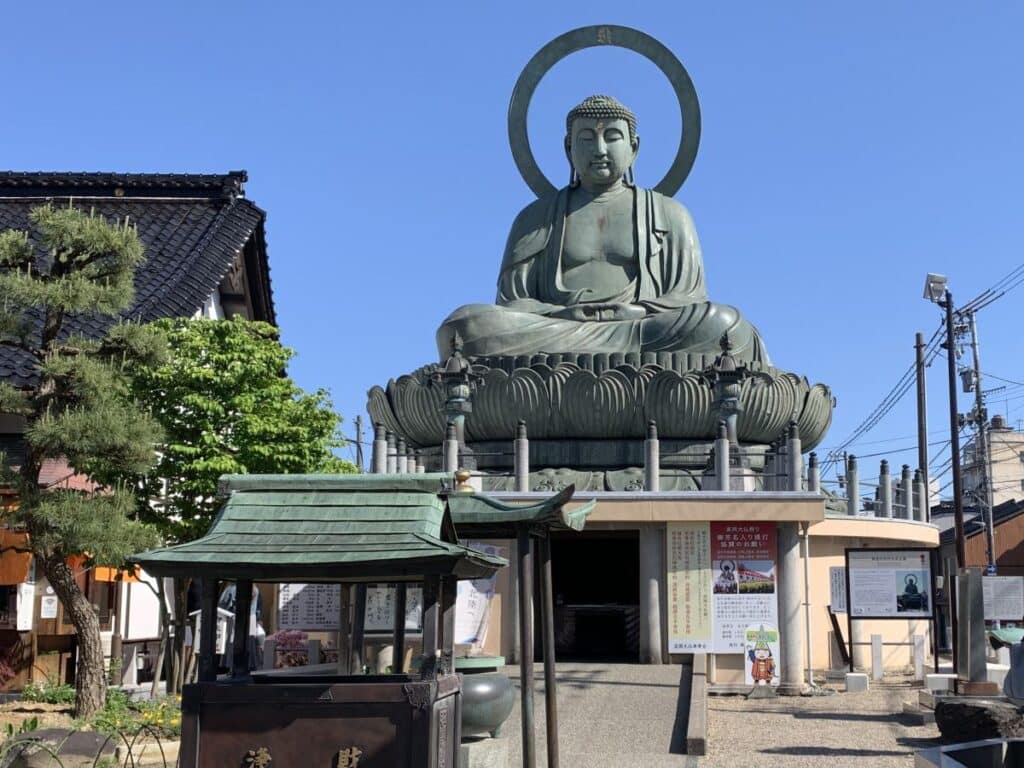
Other sights to check out include the old area of the city, which is reminiscent of Takayama, but with even fewer crowds, and the large Buddha. Our upcoming guide to spending a day in Takaoka provides a more detailed plan.
Onnaiwa Rock
This beautiful sight is located on the Amaharashi Coast between Himi and Takaoka. You can get out and take specific pictures, or I shot this one out of the train window on the way back from Himi. Follow our guide to photographing Onnaiwa Rock to discover the best spot to take pictures and the optimal times to do so.

I visited all of the above in one day, but it was a bit too rushed, and I definitely didn’t allow enough time in Himi. You might want to pick either Himi or Takaoka, with perhaps a side trip to the Amaharashi Coast, and take things at a more leisurely pace.
The Kurobe Gorge Railway
This very picturesque railway runs from Unazaki Station to Nekomata, crossing tall bridges and passing through beautiful forests – it’s stunning during the fall foliage season.
Getting to Unazuki Onsen, the main station close to where you join the train, is included in the Hokuriku Arch Pass, but the sightseeing train is not. It costs 2820 yen return for adults, 1420 yen for children.

You can either go to the Kurobe Gorge from Nagano on the way to Toyama on Day Two. It takes 50 minutes to get to Unazuki Onsen from Nagano.
Or, use it as another day trip option today. It takes just 12 minutes by Shinkansen to Unazuki Onsen from Toyama. This is much quicker than the local train, but it’s also significantly more expensive; however, because the Hokuriku Arch Pass covers it, you won’t incur any additional costs.
You can find the sightseeing train timetable here to help plan your day. It takes about two hours round-trip on the Kurobe Gorge Train if you don’t get off at any of the stops.
Note – if you decide to do this as a side trip between Nagano and Toyama, Unazuki Onsen station does have a handful of lockers, but I suggest sending your luggage from your Tokyo hotel to your Toyama hotel and carrying only essentials for your night in Nagano, so you’re not worrying about finding one free.
Noto Peninsula
When I originally planned my visit to this area, I also intended to visit the Noto Peninsula from Toyama. However, on January 1, 2025, a huge earthquake devastated the region, and it remained off-limits when I visited. Tourism is opening up again around here now, though, so this might also be an option for the day.
As you can see, you could spend almost a week just taking trips from Toyama alone on the Hokuriku Arch Pass, let alone continuing to our next destination! Which is somewhere you probably have heard of…. Kanazawa.
Day 4 – Kanazawa (Stay 2 Nights)
Kanazawa is a large city with a diverse range of sights to keep you interested. You will want to spend at least two nights here – possibly three if you’d like to take an optional extra day trip to Shirakawa-go.
It only takes 23 minutes to get from Toyama to Kanazawa, so you can either relax a bit in Toyama and make a late start, or head straight into all the cool things to do here.
Whatever time you get here, after dropping your bags, I’d suggest starting the day with some excellent fresh sushi from Omicho Market.

From here it’s a short walk to the very pretty streets of Kazuemachi, a small geisha district near the river, and Higashi Chaya, the main old geisha district of Kanazawa.
Our guide to Highashi Chaya highlights all the must-see attractions – from shops offering pottery and other crafts, entire walls adorned with gold leaf, the opportunity to create your own gold-leaf-motif box, some intriguing shrines, and the charming streets that give this part of the city its traditional, unspoilt look.
From here, jump on Kanazawa’s very convenient buses and head to Kenrouken Garden – one of Japan’s three most important gardens that’s stunning in every season. Finally, if time allows, visit Kanazawa Castle or the peaceful DT Suzuki Museum.
Details on these and their opening hours can be found in our top 10 Kanazawa guide.

Where to Spend Your Evening
I would suggest returning to Higashi Chaya just before dusk to experience the area without crowds and with the beautiful Golden Hour light.
If you want to stay here to eat, though, come with a definite plan. While plenty of places around here open for lunch, far fewer places open in the evening. One exception is the pizza restaurant Perche, which makes an excellent Italian-style pizza. It’s open from 6 pm to at least 11 pm every day except Wednesday.
Where I Stayed in Kanazawa
Hotel Forza – and I thought this was a great hotel. It was an excellent location, a nice room with a sofa (when you’re used to staying in tiny Japanese hotels where the room barely fits your suitcase, as I am, this is very exciting) – and they give you a complimentary welcome wine or sake – I had mine while my washing was on!
For more hotel ideas, though, see our guide on where to stay in Kanazawa.
Day 5: Exploring Kanazawa
Yesterday, you explored an old geisha district – today, you’re going to explore Kanazawa’s samurai history – starting with the absolutely amazing Ninja Temple located in the south of the city.
This is a maze of hidden rooms and tricky defences that I found totally fascinating. You need to book a tour in advance, but on most days, you can do this once you arrive via an intercom.

The area around the Ninja Temple is known as the temple district, and some of Kanazawa’s most interesting temples can be found here, including Gyokuryu-ji with its surprising Gundam head peeking out of the gate or Kourin-ji, with its display of Noh masks and wish-granting garden. Spend some time wandering these before or after your visit to the Ninja Temple.
Once you’ve finished exploring here, walk up through the Nishi Chaya District, a smaller but still pretty geisha district, then wander into Nagamachi, the old Samurai Area. Here, you’ll notice a dramatic change in architecture with pretty wooden houses giving way to thick-walled mansions. Make sure you stop off at Kayuan, for a traditional lunch or some sweets.
From here, it’s a short 13-minute walk to visit the Contemporary Art Museum. Note that if you want to visit the famous Swimming Pool exhibit here, you need a timed booking made in advance. See our guide to Kanazawa’s top sights for more details on how to do this.
Where to Spend the Evening
That day was pretty full on, so you might just want to take a break and stay near your hotel. If you took my advice and stayed at the Hotel Forza, try visiting Aburaya. Their specialty dish of spicy brothless ramen has gone onto my list of the most memorable things I’ve eaten in Japan.
Or head to a restaurant near your own hotel. It doesn’t take much searching to find good food in Kanazawa – our guide to where to eat in Kanazawa highlights some of my favourites.
Visiting Shirakawa-go
Transport between this picturesque town, approximately a 90-minute drive from Kanazawa, is by bus and is not included in the Hokuriku Arch Pass, which is why it’s not officially included in this itinerary. But it’s on many people’s must-see lists in this area, so I’m going to explain how to do it as a side trip.
Basically, you catch the bus from Kanazawa Station. It costs 5600 yen return. Reservations are essential.
You can do this in half a day, so you could leave some of the sights above off your list and spend the morning travelling to Kanazawa, returning at lunchtime – or, add another day to your time in Kanazawa and head straight to Kyoto instead of visiting our stop tomorrow.
If you do decide to visit, check out this guide on the things I wish I’d known before visiting Shirakawa-go to make the most of your visit.
Day 6: Kaga Onsen
Even the best-laid plans can sometimes go awry, and this is how I messed up mine. I should have spent a day, or preferably, a night relaxing in Kaga Onsen after my trip to Kanazawa – but I totally bypassed the chance to unwind after a hectic few days. You may want to learn from my mistake and take a break during your trip.
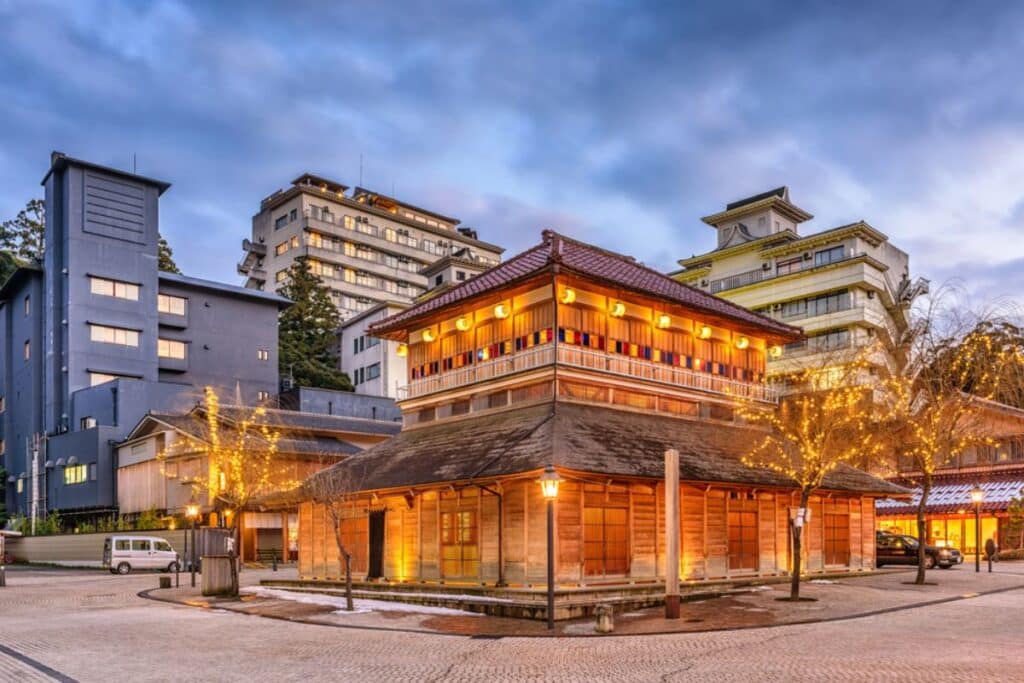
Kaga Onsen is actually four small hot spring-focused towns – Yamashiro Onsen, Awazu Onsen, Katayamazu Onsen and Yamanaka Onsen. These are easily accessible from Kaga Onsen station, which you reach by shinkansen on the Hokuriku Arch Pass, via the local CAN bus, which tours the onsen towns.
A single journey on the bus costs 500 yen, or you can buy one or two-day passes, which allow you to explore the sights in the region before you enjoy soaking in the onsen. You don’t need to book the bus in advance – the routes, stops, sights of interest, and timetable can all be found here.
Each onsen town has its own public bath, hotels offering both public and private onsens, and other attractions, including strawberry picking, pottery businesses, art museums, and more.
Find hotels in the region on your dates via the map below.
Day 7: Head to Kyoto
Relax for a few more hours in the onsen, then complete the last part of your journey.
Catch the Shinkansen from Kaga-onsen to Tsuruga Station.
Here, you’ll switch to the Limited Express Thunderbird train, which takes you directly to Kyoto Station. Many people worry about this change, but it takes about five minutes and is clearly signposted. You’ll also find lifts available for use if you’re travelling with luggage.

The Limited Express Thunderbird is another reserved-seat-only service, so be sure to book your seat on the train in advance, either before you leave Kanazawa, at Kaga-onsen, or, as a last resort, at Tsuruga. Reserved seats are included as part of the Hokuriku Arch Pass.
From Tsuruga, it will take a little less than an hour to reach Kyoto Station where you’ll be greeted by the view above ready for your next set of adventures to begin. And, if you’re looking for some ideas, take a look at our four-day Kyoto plan.
Who Writes This Blog?
My name is Helen Foster, and I’m a journalist and author. My travel articles have appeared in publications including The Australian, Escape, RAC Horizons, Jetstar Magazine, Sainsbury’s Magazine, and more.
I’ve travelled to Japan nine times before – solo and with my partner and visited over 50 towns and cities. My last visit was in April 2026, so everything here is pretty up to date.

