- Hakone’s Venetian Glass Museum – The Biggest Surprise in Town - 19 March 2026
- How to Fill in Your Visit Japan Web Arrival Documents for Japan - 18 March 2026
- The Beginners Guide to Getting on the Shinkansen - 16 March 2026
If you’re visiting more than one city on your trip to Japan, you might be using a Japan Rail Pass to get around – and, there’s also a good chance you have questions like how the Japan Rail Pass works, where to buy your Japan Rail Pass – and more. This post will answer them.
I’ve exchanged five rail passes over the years and used the pass on over 30 Shinkansen journeys, so I know the drill. Promise!

Article by Helen Foster. Disclosure: Some links in this post are affiliate links. See our Affiliate Disclosure.
Quick Summary
This is a pretty long post, but here are the main points you need to know…
- Since the price increase, the Whole JR Pass is not worth buying for most people. However, regional rail passes can save you some money – and work the same way.
- When you buy a Rail Pass, you get a voucher you must exchange for the actual rail pass at an exchange office in Japan. You need your passport to do this.
- You can’t use the fastest shinkansen – the Nozomi and the Mizohu – with all passes.
- You should buy your rail pass about a month before you travel.
- Most companies sell the pass for around the same price, so there’s not a lot of point in spending ages shopping around. Reputable sellers include Klook. I used them on my last trip and got the passes within a week.
- One benefit of the rail passes is free seat reservations.
- We’ll explain all of those things and more in more detail in the post that follows.
- What is The Japan Rail Pass?
- Where Can You Use Your Japan Rail Pass?
- Do You Actually Need a Japan Rail Pass?
- Where to Buy The Japan Rail Pass?
- Eh, What’s This Voucher Thing?
- Booking a Meet & Greet
- When to Buy Your Pass
- When to Start It
- How to Use Your Pass To Get On a Train
- Making Seat Reservations
- A Quick Note About Luggage
- Traveling in an Unreserved Carriage
- How to Read a Japanese Train Sign
- How to Read a Seat Reservation Ticket
- What to Carry on the Train
- On The Train
What is The Japan Rail Pass?
Also known as the JR Pass, the Japan Rail Pass is a way of traveling around Japan on the shinkansen (or bullet trains), certain other local trains, and some ferries run by the Japan Rail – or JR – rail company for one flat price.
The pass is only available to tourists visiting Japan.
There are also regional rail passes that work in different regions – these work in pretty much the same way as the rail pass; they just don’t cover the whole country – when people mention THE Japan Rail Pass, they mean the Whole Japan Pass. Although, the principle of using the regional passes is pretty much the same.
Where Can You Use Your Japan Rail Pass?
Here’s what it works on…
The Shinkansen: You can go from one of Japan to the other on your rail pass using the super fast shinkansen or bullet train.
You can use bullet trains in any area, but you can’t get on the absolute fastest type of train, called the Nozomi or Mizuho, without paying an extra supplement.
Don’t worry, though; it can take as little as half an hour longer to travel the 500km between Tokyo to Osaka on the trains that are included – the Kodama, Sakura, and Hikari.
Some regional passes do include the Nozomi or Mizuho.
Limited Express Trains: If you’re travelling to or from a smaller city you are more likely to travel by limited express train than Shinkansen.
They are quicker than other local trains as they don’t stop at every station.
All Limited Express trains run by JR lines are free with your pass, including the Haruka Express, which connects Osaka’s Kansai airport to the city.
Other Local JR trains: So, say you want to go and see the bamboo forest in Arashiyama, Kyoto, you can jump on the local JR line at Kyoto station and use your JR Pass to take you to Saga-Arashiyama station for free.
The Tokyo Monorail: Whether you’re going to or from Haneda airport, or on a day trip around super-modern Odaiba, the monorail that you use to get there is included on your pass.
The Narita Express: If you’re flying in or out of Narita instead, your pass also works on the Narita Express.
The Yamanote Line: This line circles Tokyo and goes to many tourist stops (see what’s where in our post on staying on the Yamanote Line). You can use this as many times as you like with your pass.
You can also use the pass on other JR-owned lines in Tokyo like the Chuo-Soba line.
You will still need to buy tickets on the other subway lines though (although you can save money with a Tokyo Subway Pass).
The Miyajima Ferry: If you’re taking a day trip to this island near Hiroshima, famous for it’s pretty tori gate, the ferry is included in your JR Pass.

However, just because you can use it on all those things doesn’t mean you should buy a pass. The first thing to determine about using the Japan Rail Pass therefore …
Do You Actually Need a Japan Rail Pass?
We answer this more fully in this post, but in a nutshell, now that the Whole Rail Pass has gone up in price, it’s unlikely to be worth it for most travelers – and if you’re just going to Tokyo, Osaka, and Kyoto it’s definitely not going to be worth it and it’ll be cheaper to buy individual tickets.
Here’s what you need to know about buying Shinkansen tickets online or once you get to Japan.
Once you’re at your next destination though, it might be worth considering a regional rail pass – the Kansai Passes are particularly helpful for first-time tourists. And the advice here also relates to using them.
Where to Buy The Japan Rail Pass?
For most people, the answer to this is online where you’ll find a whole host of companies selling the pass.
At this point, you might be tempted to shop around to get the cheapest pass, and that’s fine, but because the basic prices are fixed in Japanese yen, the only variation is in what exchange rate the company uses and how much they charge for shipping so, don’t expect to save hundreds – if you do see someone selling a pass for much less than their competitors, I would be suspicious.
If you’re looking for a reputable company, check out JRPass.com, an authorized seller that ships to any country.
Another good option is Klook, which you might have used to book tours and attractions. I used them on my last trip and the process was easy, the passes arrived quickly – and the price was good.
Find their Rail Pass page here.

Oh, and while you didn’t used to be able to buy the Japan Rail Pass inside Japan, that is no longer the case. You can buy it for the same price now in Japan as outside.
There are pros and cons to each option of buying your pass, and we cover those – and explore which might be better for different types of travelers in another post on where to buy your rail pass.
Eh, What’s This Voucher Thing?
When your shiny new rail pass purchase arrives at your house, you might be surprised to discover that you don’t receive the pass.
Instead, you first get what’s known as an Exchange Voucher. You don’t get your actual rail pass until you arrive in Japan and swap the voucher for it.

When I bought my first pass, I thought this was very sketchy. I even went to the London office to check them out as I was sure this couldn’t be right. But it is so; let’s explain how you turn your voucher into the actual rail pass itself.
You do this in Japan at a JR Pass Exchange Office – these are located at the main airports and main stations and are clearly marked in English. You’re also given a booklet containing their locations with your voucher.
It’s a very easy process, if a little time-consuming and bureaucratic.
1. Make Sure You Have Your Paperwork
You’ll need the exchange voucher and passport for each person who needs a Rail Pass. As I said, the Rail Pass is only intended to be used for tourists in Japan and so, they want to see your passport to check that you have a tourist stamp on it.
Top Tip: Take a pen with you as, even though you have the exchange order, you will also have to fill in a form to swap the pass. If you have a pen, you can do this in the queue (there’s pretty much always a queue!).
2. Check Your Dates
You will also need to decide what day you want your Rail Pass to start, as this will be stamped on it when you pick it up. This should be the day you plan to take your first journey using it.
That day is when your pass actually becomes valid.
The seven, 14, or 21 days that you book your pass for begins at that point, and it’s consecutive calendar days (not 24-hour periods) – so, if you have a seven-day pass and you first use it on Monday at 2 pm, it’s then valid until midnight on the following Sunday.
Once all that’s done, you will swap your voucher for a little blue ticket.
That’s your actual Japan Rail Pass. Do not lose it; it’s like cash, if it’s gone, it’s gone.

Booking a Meet & Greet
If all of the above has made your head hurt slightly, especially the idea of doing it all after a long flight, you can book a meet-and-greet service from Japan Rail Pass.
With this, a representative will meet you from your flight and do all the above for you.
They can also help you pick up pocket wifi if you’ve booked it, help you change money or work the ATM, and make sure you get on your transport from the airport to your hotel.
When to Buy Your Pass
Once received, your exchange voucher must be exchanged within 90 days of purchase – so, even though it’s a big expense, don’t buy it too soon before your trip, but do allow enough time for it to be posted to you.
I think about a month before is the perfect time.
When to Start It
Because the Rail Pass covers the Narita Express, The Hakura Express, and the monorail, which all connect the airports in Tokyo and Osaka to their respective cities, and Yamanote Line in Tokyo itself, a lot of people activate their Rail Pass as soon as they get off the plane at one of the airport offices and use it as soon as they arrive to get from the airport to their hotel.
I am not one of those people! These offices are often very busy and the idea of standing in a long queue, with my suitcases when I’m tired after a long flight is not appealing.
If you arrive on very early flights, you might also have to wait a couple of hours for the office to open.
If it works for my trip, I’d rather pay the fare into Tokyo and activate my pass later, timing it so I use the pass to get back to the airport.
Unless you need to use the Rail Pass to get into Tokyo so you don’t waste a day of it, then you might also want to leave it a day or two.
How to Use Your Pass To Get On a Train
Turn up, find the platform, and get on – it can be that simple.
It used to be that you had to show your Rail Pass to a staff member to get to the platform, but now, the pass goes through the ticket like a normal rail ticket.
This does increase the risk that you’re going to lose it, though so make sure you collect it after every machine.
Sometimes if people find a lost JR Pass in the station, they’ll hand it into the stationmaster or local police box. You could try checking these if you lose it. To increase the chance of getting it back, take a photo of the pass as it has a serial number and an expiry date – if your photo and the pass match, you’ll know it’s yours.

Despite being pretty flimsy, it does last quite well – this is mine after three weeks of travel. Do make sure you have somewhere safe to keep it, though, so it doesn’t get excessively bent or wet in your bag or waller.
Watch For Some Scams
I can’t believe I’m typing this in a post about Japan, one of the safest countries I have ever traveled in, but there’s chatter in some Japan groups about a couple of scams happening with the rail pass now the price has increased.
One is people pushing in front of tourists using the pass as they go through the barriers – and grabbing the pass from the other side of the machine. Make sure you’re the only person going through the barrier before putting in your pass.
There have also been people collecting passes at Narita, saying that they must be handed in before tourists leave the country. This is not true.
I’ve only heard a couple of reports of this, so I don’t think it’s widespread, but because Japan is perceived as so safe many of us let our guard down there – but you do still have to have your wits about you.
Before you rock up to the ticket barrier, though, there’s something you might want to do, and that’s book your seat.
Making Seat Reservations
Japanese trains are divided into three types of carriage – Green Cars, which are like first class and need a seat reservation, then there are Ordinary Class unreserved carriages, which anyone can travel in without booking; and Ordinary Class reserved cars, which you need to pay an extra fee to sit in an allocated seat.
One of the big perks of the Japan Rail Pass is that you get to make these seat reservations for free.
All you have to do is go into the ticket office or a ticket machine and book them.
If you’re going on a long journey, or are travelling in a group and definitely want to sit together, then you’ll want to make seat reservations.

Where to Go to Make a Seat Reservation
To do this, find a JR Ticket Office – also known as a Midori-no-Madoguchi at any big station. If it has a sign outside that includes a green circle with a white figure sitting in it, you’re in the right place, and they do seat reservations.
If you already know what times and days you’d like to travel around Japan, you can try and make all of these reservations in one go.
If you want to make the person in the ticket office happy, have the dates, departure station destination, and train times all written down on a handy piece of paper and just pass it over.
Our guide to the Navitime app explains how to get the train times.
You can also make seat reservations on machines near ticket offices. They look like the one above.
Check out our Bullet Train Planner
Our printable bullet train planner makes using Japanese trains easy. It has all the tips and tricks you need – and includes fillable journey sheets to help you analyze if any passes are worth it, but also make the seat reservation or ticket process easier.
And even though it only costs a few bucks anyway, blog readers get a 25 percent discount – just enter the promo code BLG25 when you reach the checkout of the Japlanease Etsy Shop.
A Quick Note About Luggage
If you’ve read our Japan Packing List you’ll already know this, but there are some rules as to what size luggage you can take on the Shinkansen between Tokyo and Osaka/Kyoto (and some other trains). Some bags need you to book a space for them while you book your seat reservation.
Basically, if you add up the height, length, and depth of your luggage and it measures under 160cm (which is a bit larger than cabin bag size), it can go in the carriage with you.
If it adds up to 160-250cm, then you’ll have to reserve a slot for a luggage area on the train when you book your seat.
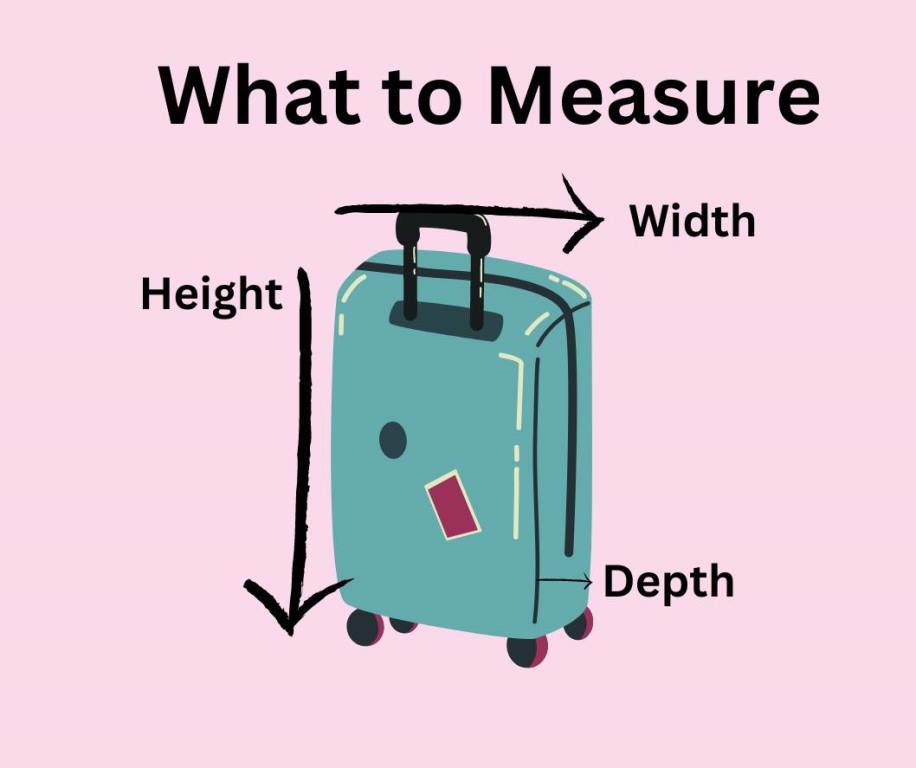
Bags over 250cm are no longer allowed on the Shinkansen between Tokyo, Osaka and Kyoto (and some other trains) and will need to be forwarded to your destination by a luggage service.
Hotels can organize this for you, but that’s a pretty big bag to be hefting around Japan anyway, so it’s probably best to use a smaller one if you can.
Spaces can be limited, so, if you are carrying bigger bags, I’d suggest making your reservations as soon as you can on your trip.
Traveling in an Unreserved Carriage
While having a seat reservation gives you a sense of security when traveling, you don’t have to have a seat reservation to use your Japan Rail Pass.
If you don’t want to plan in advance, or, you finish a day trip earlier or later than you planned, that’s okay, you can use the unreserved carriages.
These basically work the same way as normal trains in the UK or Australia where you just turn up, get on, and hope you’re not standing for an hour!

The only difference from trains elsewhere is that there’s a limited number of unreserved carriages, so you have to make sure that you’re waiting at the correct point on the platform to get in one. The good thing is that the signs on the platform will tell you this in advance.
Most of the time, you’ll always get an unreserved seat if you’re getting on the train at the first stop (the exception being Golden Week or New Year when you might have to let a train or two pass). So, if you’re leaving Tokyo and don’t have a reserved seat, leave from Tokyo station rather than Shinagawa further down the line.
Note – you can’t take very large bags into an unreserved car on the Shinkansen serving Tokyo – Osaka – Kyoto. If your bag is bigger than 160cm (as per the tip above), you’ll have to make a seat reservation.
How to Read a Japanese Train Sign
If you’ve ever traveled regularly from London’s Euston station, where trains come in at random platforms and are announced at a few minutes’ notice leading to something that looks like the start of a marathon while people charge to the right spot before it leaves – or have ever run up and down a British train platform dragging a bag trying to find First Class (or avoid it) before the train moves, this is going to blow your mind.
Japanese trains not only pull into the same platform each time, but they tell you exactly where to stand on the platform to find your seat!!
You just have to know where to find the information, and the answer is on the electronic signs like these…
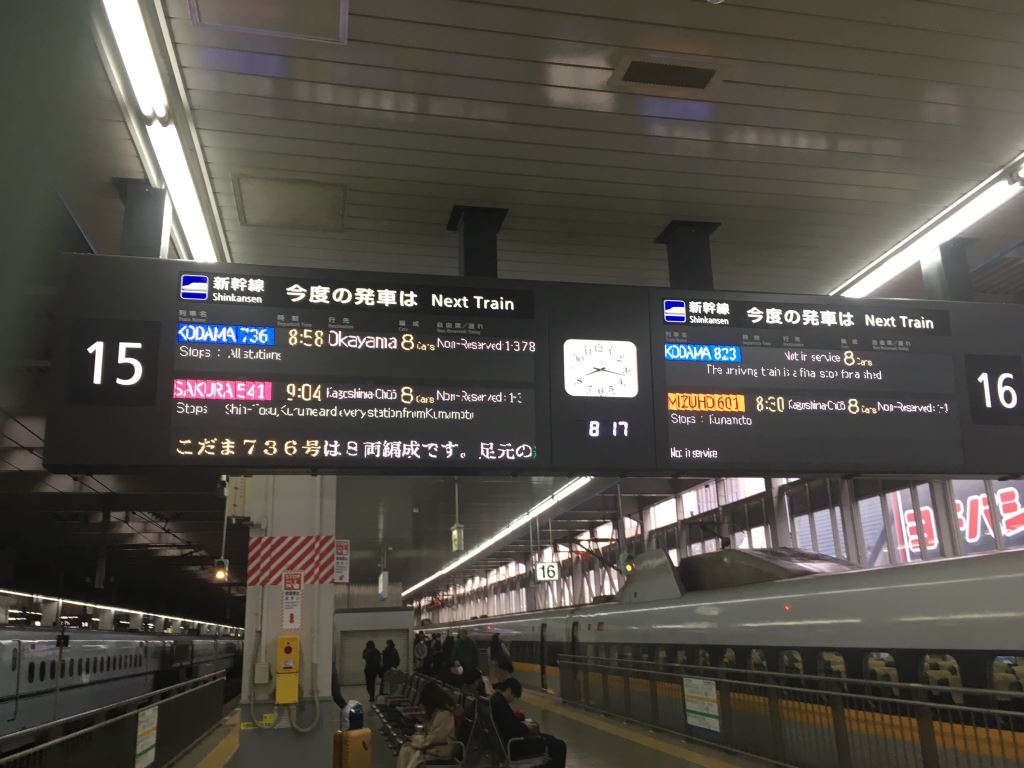
So, what does all that mean…
The first colored column is the train type and number. This is handy if you’re looking to travel on an unreserved car and want to make sure you don’t accidentally jump onto a Nozomi or Mizhou.
If you have a seat reservation, the name and number will also be listed on your seat reservation ticket. Double-check that the next train type and number match what’s on your ticket, and then you know you’re on the right train.
The second column is the time of departure – and the train WILL be on time.
The third column is the destination, and the stops en route run along the underneath this. Don’t panic if it’s all in Japanese; the English version will come next.
Now we get to the important bits to do with finding your seat.
The fourth column tells you how many cars the train has – this will be important when trying to work out where you need to stand.
If you have a reserved seat, you can now find your car number marked on the edge of the platform, remembering how many cars the train has as sometimes this will affect positioning. Join the queue to get in. The car is also marked on the electronic sign by the train door itself.
If you are traveling in an unreserved car, the last section is the important one – this tells you what number of carriages are open for those without seat reservations (so it’s 1, 3, 7, and 8 in the example above). Now, you can also go and stand at the right place on the platform.
How to Read a Seat Reservation Ticket
This will be given to you when you make your seat reservations. Each person traveling should have their own one of these. Here’s what they mean

- Where the train leaves from (Kagoshima-Chuo)
- Where you’re going (Shin-Osaka)
- The date of travel (April 4)
- The time the train leaves (15.01)
- The time it gets to your destination (19.24)
- The type of train and number (match this to the station sign) (Sakura 562)
- The car number you need to find (Car 4)
- Your seat in that car (Seat 15 B)
- Whether it’s smoking or not (Cigarette)
What to Carry on the Train
While putting your pass through the gate gets you on the platform, on the Shinkansen and Limited Express trains, you will probably also have your ticket checked by the train inspector. Just show them your pass and your seat reservation ticket, and all will be fine.
Technically, though, you also need to be carrying your passport with you whenever you use the Japan Rail Pass (and, in fact, all the time in Japan) so, make sure you also have that with you when using it.
On The Train
Announcements will be in both Japanese and English, so don’t worry, you’ll know when your stop is coming.
There’s also usually an electronic sign at the end of the carriage that shows you all the stops.
If you’ve still got your luggage with you, small cases should go in the luggage rack above the seat or in front of you – not in the aisles.
If you have booked a space for larger cases, they will go in the oversized luggage area in your carriage.
You’ll notice how clean and quiet everything is – please try and act the same way. If you need to use your phone, then go to the area between the carriages to chat.
On a long journey, it’s okay to eat at your seat, and many trains have a trolley that comes along selling snacks and refreshments if you didn’t pick up anything before you departed.
When your stop is coming, it will be announced – get ready early. If it’s not the last stop, the trains don’t spend that long on the platform.
Have a great journey.
So, that’s everything you need to know about using the Japan Rail Pass, but if you do have any further questions, head over to our Facebook Group, and I’ll do my best to answer them.

Who Writes This Blog?
My name is Helen Foster, and I’m a journalist and author. My travel articles have appeared in publications including The Australian, Escape, RAC Horizons, Jetstar Magazine, Sainsbury’s Magazine, and more.
I’ve traveled to Japan eight times before – solo and with my partner and visited over 25 towns and cities. My last visit was November 2024 so, everything here is pretty up to date.

